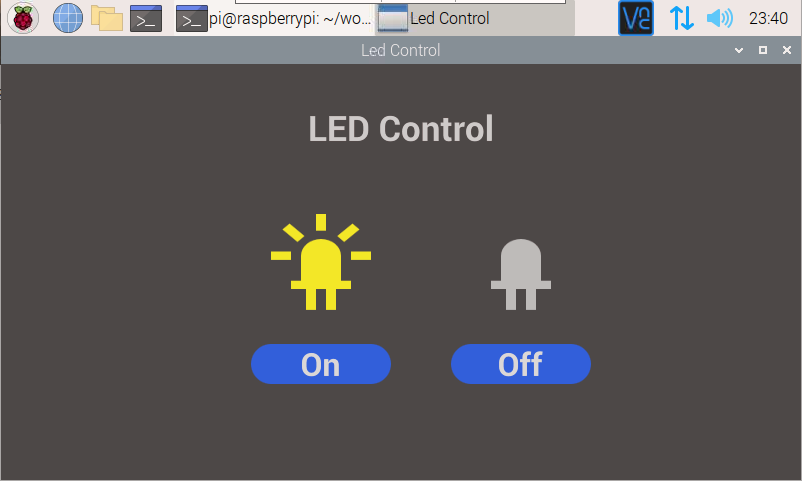
这里介绍在树莓派上使用Pyside2+QML方式进行GUI程序的开发,该GUI程序可以通过按钮来控制LED。
1、准备
开发环境使用PyCharm+QtCreator+树莓派远程开发方式,参考之前教程: 树莓派GUI远程开发-pyside2开发环境搭建
树莓派需要安装pyside2库和GPIO Zero库,本次使用这两个库进行开发,参考之前python操作LED的教程: 使用PyCharm进行树莓派的远程开发-python
2、步骤
2.1、新建项目
新建一个python项目,并填写好项目本地路径和树莓派远程路径,如下: 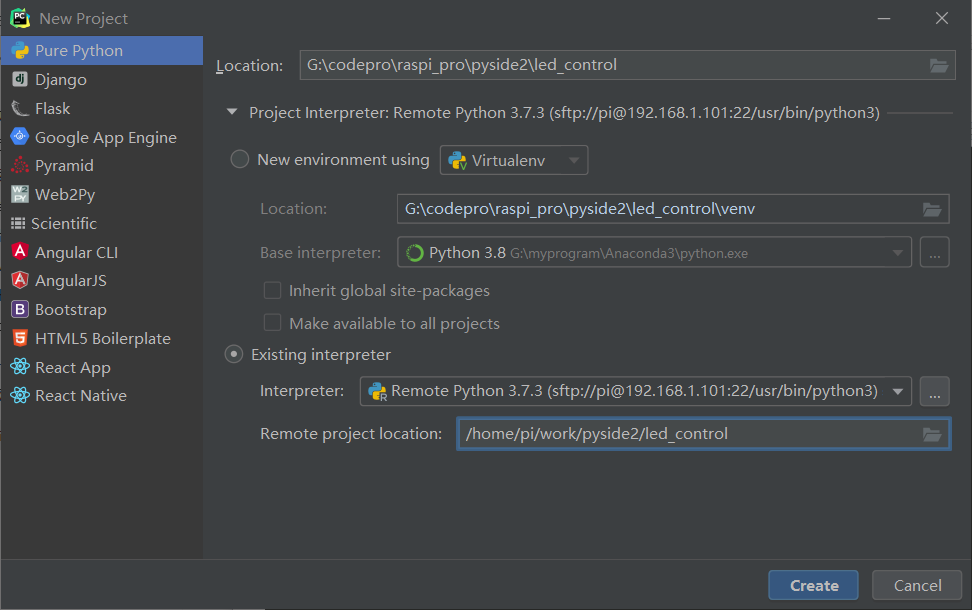
2.2、新建python文件
新建文件 main.py,文件内容如下:
1
2
3
4
5
6
7
8
9
10
11
12
13
14
15
16
17
| import os
import sys
from pathlib import Path
from PySide2.QtCore import QObject, Slot
from PySide2.QtGui import QGuiApplication
from PySide2.QtQml import QQmlApplicationEngine
if __name__=="__main__":
app = QGuiApplication(sys.argv)
engine = QQmlApplicationEngine()
engine.load(os.fspath(Path(__file__).resolve().parent / "ui/led.qml"))
if not engine.rootObjects():
sys.exit(-1)
sys.exit(app.exec_())
|
2.3、新建qml界面文件
在工程目录新建ui文件夹,并在其下新建led.qml文件,然后右键用QtCreator打开,并在QtCreator中完成ui设计: 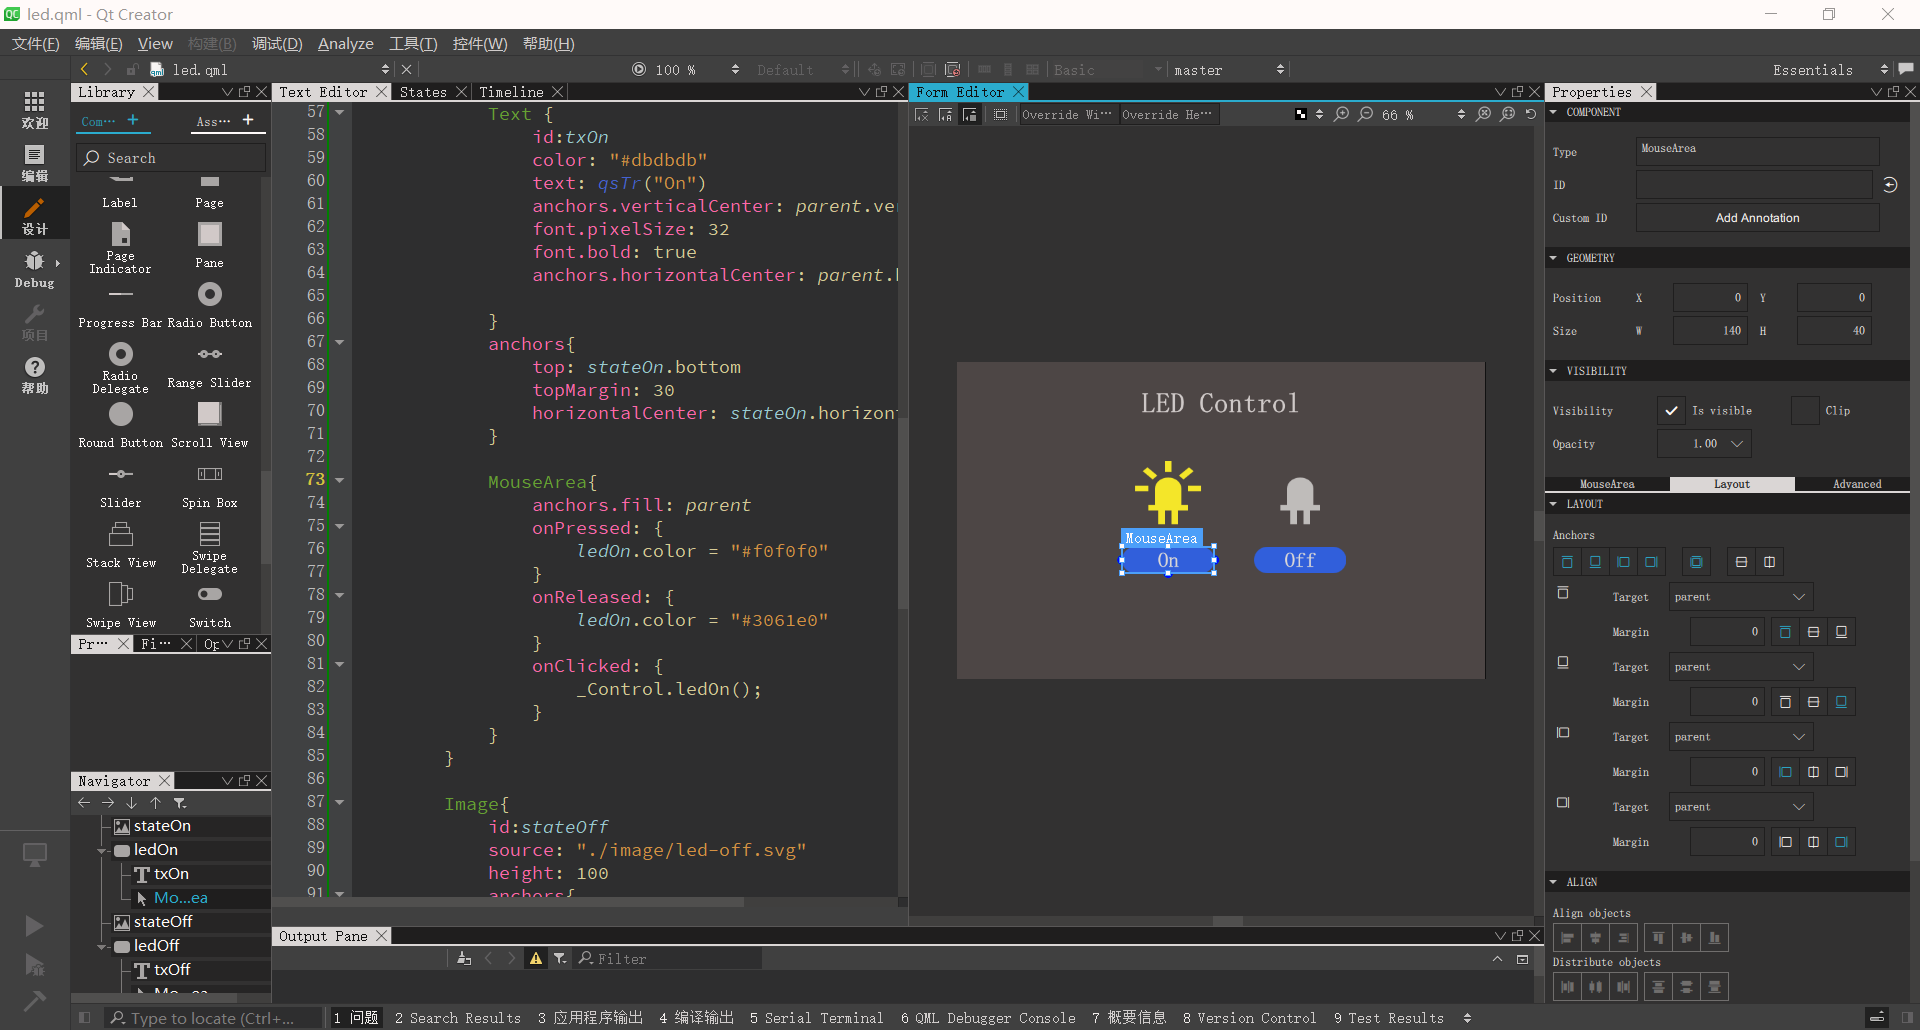 qml文件内容如下:
1
2
3
4
5
6
7
8
9
10
11
12
13
14
15
16
17
18
19
20
21
22
23
24
25
26
27
28
29
30
31
32
33
34
35
36
37
38
39
40
41
42
43
44
45
46
47
48
49
50
51
52
53
54
55
56
57
58
59
60
61
62
63
64
65
66
67
68
69
70
71
72
73
74
75
76
77
78
79
80
81
82
83
84
85
86
87
88
89
90
91
92
93
94
95
96
97
98
99
100
101
102
103
104
105
106
107
108
109
110
111
112
113
114
115
116
117
118
119
120
121
122
123
124
125
126
127
128
129
130
131
132
133
134
135
136
137
138
139
140
| import QtQuick 2.11
import QtQuick.Window 2.11
import QtQuick.Controls 2.4
ApplicationWindow {
id:root
title:qsTr("Led Control")
visible: true
width: 800
height: 480
background: Rectangle{
color: "#4d4747"
anchors.fill: parent
}
Text {
id: info
color: "#cfcdcd"
text: qsTr("LED Control")
anchors{
horizontalCenter: parent.horizontalCenter
top: parent.top
topMargin: 40
}
font.bold: true
font.pointSize: 26
}
Item {
id: contains
anchors{
left: parent.left
top:parent.top
leftMargin: 260
topMargin: 150
}
Image {
id: stateOn
anchors{
left: contains.left
top:contains.top
}
height: 100
source: "./image/led-on.svg"
}
Rectangle{
id: ledOn
color: "#3061e0"
radius: 20
width: 140
height: 40
Text {
id:txOn
color: "#dbdbdb"
text: qsTr("On")
anchors.verticalCenter: parent.verticalCenter
font.pixelSize: 32
font.bold: true
anchors.horizontalCenter: parent.horizontalCenter
}
anchors{
top: stateOn.bottom
topMargin: 30
horizontalCenter: stateOn.horizontalCenter
}
MouseArea{
anchors.fill: parent
onPressed: {
ledOn.color = "#f0f0f0"
}
onReleased: {
ledOn.color = "#3061e0"
}
onClicked: {
}
}
}
Image{
id:stateOff
source: "./image/led-off.svg"
height: 100
anchors{
left: stateOn.right
top: stateOn.top
leftMargin: 80
}
}
Rectangle{
id: ledOff
color: "#3061e0"
radius: 20
width: 140
height: 40
Text {
id:txOff
color: "#dbdbdb"
text: qsTr("Off")
anchors.verticalCenter: parent.verticalCenter
font.pixelSize: 32
font.bold: true
anchors.horizontalCenter: parent.horizontalCenter
}
anchors{
top:stateOff.bottom
topMargin: 30
horizontalCenter: stateOff.horizontalCenter
}
MouseArea{
anchors.fill: parent
onPressed: {
ledOff.color = "#f0f0f0"
}
onReleased: {
ledOff.color = "#3061e0"
}
onClicked: {
}
}
}
}
}
|
2.4、界面按钮控制LED
- 首先在python文件中,新建一个类用于控制LED,使qml调用这个类的槽函数即可在界面中进行控制:
1
2
3
4
5
6
7
8
9
10
11
12
13
14
15
16
17
18
| ...
from gpiozero import LED
class Control(QObject):
led = LED(26)
@Slot()
def ledOn(self):
print("led on")
self.led.on()
@Slot()
def ledOff(self):
print("led off")
self.led.off()
....
|
1
2
3
4
5
| ......
context = engine.rootContext()
controler = Control()
context.setContextProperty("_Control",controler)
......
|
打开按钮的点击时候:
1
2
3
| onClicked: {
_Control.ledOn();
}
|
关闭按钮点击时候:
1
2
3
| onClicked: {
_Control.ledOff();
}
|
2.5、运行
- 上传工程到树莓派
- 运行python文件即可
- 界面显示如下