RIOT-OS入门 Windows系统下在STM32上运行RIOT OS
1、开发环境
1.1 软件和文档
- RIOT OS:https://github.com/RIOT-OS/RIOT
- windows上开发环境配置教程:https://github.com/RIOT-OS/RIOT/wiki/Build-RIOT-on-Windows-OS
1.2 主要步骤
- 下载编译工具 GNU Arm Embedded Toolchain gcc,然后将其放置到环境变量;
- 下载MinGW,并选择安装mingw32-base, mingw32-gcc-g++, msys-base和msys-mintty
- 安装完成后,将安装目录下 xx\msys\1.0\bin下的mintty建立桌面快捷方式,并设置目标为: xx\msys\1.0\bin\mintty.exe /bin/bash -l
- 打开桌面的mintty并执行mingw-get update更新
- 然后执行mingw-get install安装msys-wget, msys-zlib, msys-unzip, msys-mktemp
- 最后将mingw和msys下的bin目录添加到环境变量
以上步骤完成后基本设置好了开发环境。
2、测试Blink程序
2.1 编写Blink简单的程序
- 下载RIOT OS仓库;
- 在主目录下新建myproject文件夹,用于放置后面自己开发的工程;
- 拷贝同级目录examples下的hello-world工程到myproject文件夹下,这个就作为之后开发的工程模板;
- 修改工程代码
- main.c文件更改如下:
主要添加board.h和xtimer.h文件定义,用于LED和延时操作。1
2
3
4
5
6
7
8
9
10
11
12
13
14
15
16
17
18
19
20
21
22
23
24
25
26
27
28
29
30
31
32
33
34
35
36
37
38
39
40
41
42
43
44
45/*
* Copyright (C) 2014 Freie Universität Berlin
*
* This file is subject to the terms and conditions of the GNU Lesser
* General Public License v2.1. See the file LICENSE in the top level
* directory for more details.
*/
/**
* @ingroup examples
* @{
*
* @file
* @brief Hello World application
*
* @author Kaspar Schleiser <kaspar@schleiser.de>
* @author Ludwig Knüpfer <ludwig.knuepfer@fu-berlin.de>
*
* @}
*/
int main(void)
{
puts("Hello World!");
printf("You are running RIOT on a(n) %s board.\n", RIOT_BOARD);
printf("This board features a(n) %s MCU.\n", RIOT_MCU);
printf("led blink testing.\r\n");
while (1)
{
LED0_TOGGLE;
xtimer_sleep(1);
}
return 0;
}- Makefile文件更改如下:
主要更改BOARD定义为bluepill,因为我这里使用stm32f103c8t6小篮板,然后要使用xtimer模块和rtt stdio模块,添加USEMODULE定义1
2
3
4
5
6
7
8
9
10
11
12
13
14
15
16
17
18
19
20
21
22
23
24
25
26# name of your application
APPLICATION = hello-world
# If no BOARD is found in the environment, use this default:
BOARD ?= bluepill
# This has to be the absolute path to the RIOT base directory:
RIOTBASE ?= $(CURDIR)/../..
# Comment this out to disable code in RIOT that does safety checking
# which is not needed in a production environment but helps in the
# development process:
DEVELHELP ?= 1
USEMODULE += xtimer
# segger rtt
CFLAGS += -DSTDIO_RTT_ENABLE_BLOCKING_STDOUT
USEMODULE += stdio_rtt
# Change this to 0 show compiler invocation lines by default:
QUIET ?= 1
include $(RIOTBASE)/Makefile.include
2.2 编译
在mintty终端中执行make,即可生成bin文件
2.3 烧录
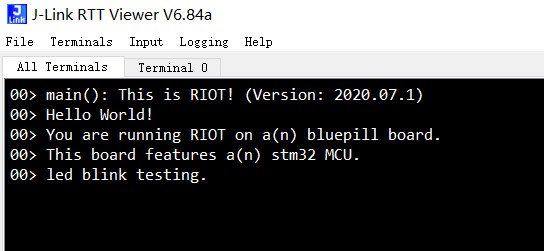
将工程目录下的bin/bluepill文件夹下的bin文件用串口或jlink少些到开发板即可看到LED闪烁,同时连接了Segger RTT Viewer后可以看到打印信息: 
3、其他说明
这里是在windows环境下的开发环境,其实更适合的是使用linux下开发,可以用native目标编译,便于调试,无需硬件。 注:在上面步骤中,make的版本和最新版的RIOT OS不匹配,可能会报错,根据说明最新板2020.1后需要make 4版本,而通过mingw安装的环境是3.x版本,编译会报错,需要修改RIOT OS根目录下的Makefile.include文件,将一行的4.x改为3.x如下: 最新版为:MATCH_MAKE_VERSION = 4.% 更改为:MATCH_MAKE_VERSION = 3.%
著作权归本网站(https://makerinchina.cn)所有,转载请注明来自 MakerInChina.


